My first iPhone App - Part 2
June 27, 2010 📬 Get My Weekly Newsletter ☞
See Part 1 first
For the past several days I’ve had the app on my phone and used it to enter in wines to see how the UI was working. Yesterday, I integrated Core Data (Apple’s Object/Relational Mapper (ORM), for lack of a better description) so that I could actually save some data. I discovered some nuances to using Core Data, as well as a refinement in the UI.
UI
Last night, I had both my girlfriend Amy and my good friend Clay (who is also reasonably into wine) play around with the “new wine” screen. Neither have an iPhone, and there were a few obvious problems:
- They were very unaccustomed to the “Done” button being in the upper-right corner, as well as the “slot-machine” control
- Both had trouble with the “Wine Name” concept
- Both had trouble dismissing the keyboard
- Clay thought he was entering search terms and not a new Wine
Later that evening, I had a glass of wine at a bar and entered it into my app. Up until this point, I was just typing in wines I knew about, so this was the first “real use” of the app in the field. I quickly realized that the “Wine Name” concept, while important, was too vague and confusing to be the first field you enter. Most wines are known by the vineyard and some don’t even have proper names or appellations. So, I swapped the fields and added some examples in the placeholder text:
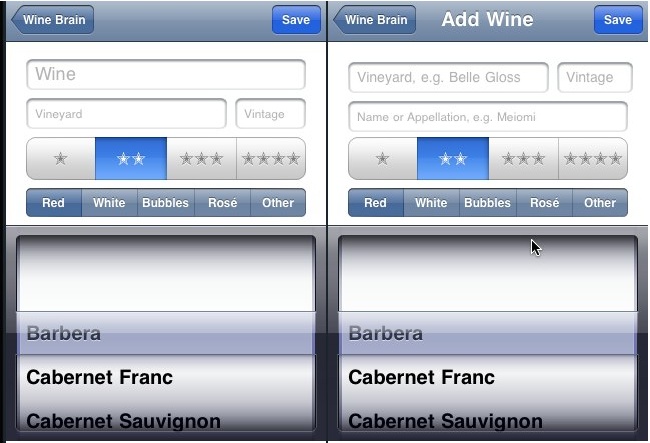
I also added a title to indicate that this screen is for adding a new wine. Finally, I used the background button trick along with some events on the rating and type controls to dismiss the keyboard if you tap anywhere outside of a text field.
This feels much cleaner and flows a bit better. While varietal is probably the third most important thing (at least for New World wines), the slot-machine control would be awkwardly placed right below the vineyard/vintage text fields, so I left it where it was.
As to Clay and Amy’s confusion over some idiomatic iPhone design choices, I’m not worrying about them a whole lot; a typical iPhone user will understand what’s going on (I hope :).
Core Data
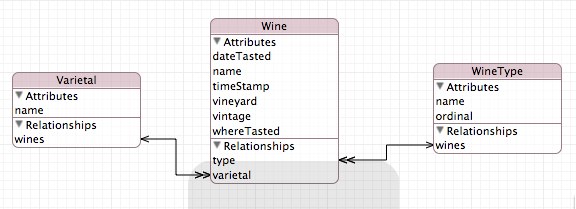
Backing all this is Apple’s Core Data, which grew out of the Enterprise Objects Framework (and was, incidentally, my first exposure to an ORM way back in 1998), is the simplest and most idiomatic way to store and manage data on the iPhone. As with Interface Builder, you create the model visually, using a simplistic data modelling tool. I set up the bare bones of my data model and generated the classes.
The first problem I ran into was in changing the model after the database had been created on the device. Core Data doesn’t migrate your model for you by default. I ended up starting over with a “versioned” model and implementing their default migration. This will probably work for simple changes, but for more complex changes, it looks like it’s somewhat difficult to migrate the model. An unfortunate reason to do some Big Design Up Front.
My next problem was initializing reference data. In my case, I wanted the list of varietals as well as the list of wine types (e.g. “red”, “white”) to be in the database and managed by Core Data. I ended up creating an array of the values inside the app and then checking the database for their existence, adding them if they were missing. It’s a bit cheesy, but I can extract the lists to plist files later. It did give me a chance to play with Objective-C’s blocks feature. I needed to map my list of Varietal objects to a list of strings, so I could compare that list against my default list. While NSArray doesn’t provide a map function, it does provide the equivalent of Ruby’s each or Scala’s foreach. In true Apple/Objective-C style, it’s called enumerateObjectsUsingBlock :)
NSMutableArray *strings = [NSMutableArray arrayWithCapacity:[array count]];
[array enumerateObjectsUsingBlock:^(id obj, NSUInteger i, BOOL *stop) {
    [strings addObject:[obj valueForKey:@"name"]];
}];
The stop pointer is an out-only variable that you set to YES to allow for an early exit from the loop. I’m glad they’ve adopted this functional style; I forsee explicit loops becoming just as quaint as GOTOs in the near future.
One thing bugged me about this process, however. I had these generated classes and it wasn’t clear how to add my own methods to them without losing the code every time I re-generated my model. Enter mogenerator. This provides a more sophisticated bit of code generation, givng you two classes for each model: one for machines (i.e. for Core Data to manage) and a subclass for people (to which I can add custom methods). Perfect! I wasn’t able to incorporate it into XCode, but I’m happy running in on the command line as needed for now.
Random Bits
I spent more time than I would’ve liked tracking down a nasty bug where every attempt to convert a string to a number (for the wine vintage year) resulted in a nil number. It turns out I was confused about when some object lifecycle methods were being called and my pointer to an NSNumberFormatter was, in fact, pointing to nil. Unlike Java, where you’d get a NullPointerException, or C, where you’d get a core dump, it seems Objective-C just returns nil and doesn’t even issue a warning. Very strange. Once I realized that, the solution was obvious.
I’m still not 100% sure I’m structuring my code properly, but Stack Overflow’s stalwart iPhone SDK answerers have been incredibly helpful in pointing me in the right direction.
Next Steps
Now that I’ve got the ability to save and retrieve data, the next step is to start looking to browsing, viewing, and editing the database. I think the domain is restricted enough that I can use the iPhone’s idiomatic drill-down table navigation to filter the database.