My Toolchain for Building Programming Books
February 03, 2023 📬 Get My Weekly Newsletter ☞
This is a bit of a long post describe the custom toolchain I created—and philosophy behind it—for the books that I’ve self-published. It was created to solve a problem that plagues technical books: keep them updated as libraries and programming environments change. My current solution completely automates all code samples, command-line invocations, screenshots, and many of the diagrams.
The Basic Process of Writing a Book
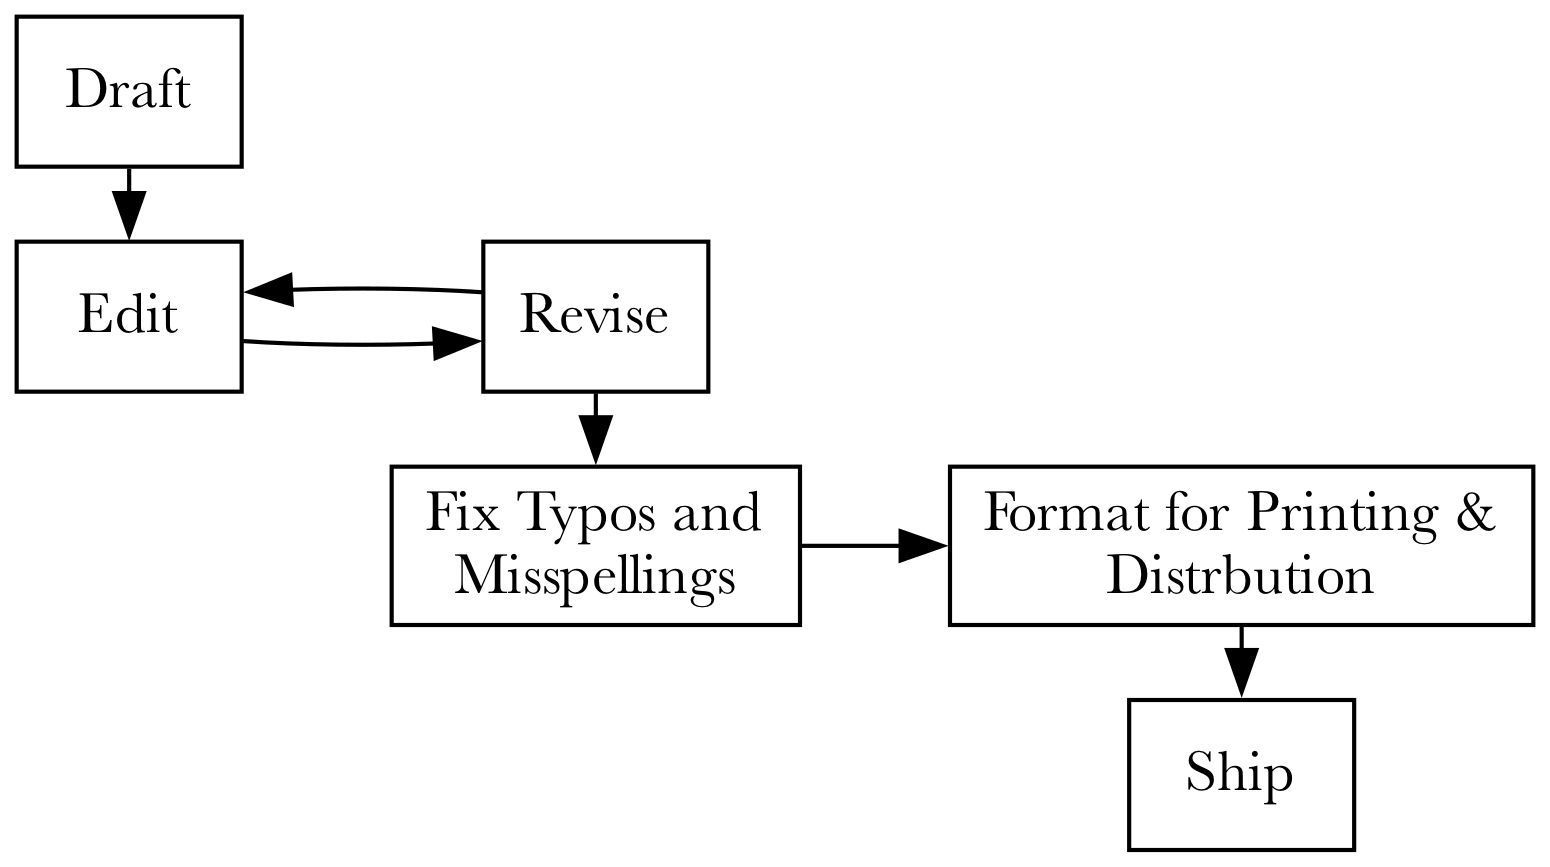
At a high level, writing a programming book is similar to writing any book. You create a draft, do some editing and get feedback, revise what you’ve written and repeat that until you are happy with the result. You then fix all the typos and misspellings, typeset it, and ship it.
For a novel, or narrative non-fiction, there’s not much more to worry about than what I described. Yes, the writing and editing is hard, time-consuming, and not for the faint-of-heart, but you are unlikely to have to update the book, don’t need to have any diagrams or code samples, and don’t need to use a web browser to take screenshots.
A programming book needs all of that. Not only does it have to be coherent, useful, insightful and correct, but it has to show code samples that work, show screenshots of the software running, and likely have diagrams to help explain complex topics to the reader. It usually needs a fair bit of cross-referencing to tie concepts from disparate chapters together and, of course an index.
But to make matters worse, the book will need to be updated to match the existing versions of the software it uses or is about. At the very least, it must be updated during the initial writing of the first edition, since this is fairly time-consuming. Of course, to extend the life of the book, it must maintain technical relevance. Thus, the code samples need to be easily updatable so they don’t fall out date, making the book useless to the reader. There’s only so many monitors the need holding-up.
A Solution: Book as Executable
I iterated on this problem over several years to arrive at the system I will now describe. While I enjoyed tinkering on it, I had to maintain focus on getting a real book written and into the hands of paying customers. I took a lot of inspiration from others and scrapped many failed attempts. What I created—and will demonstrate in detail—is basically a giant script that gets executed. That script produces the titles, chapters, sections, paragraphs, diagrams, screenshots, and code that all comprise a programming book.
The reason to do this, instead of writing some Markdown and keeping a separate folder of code samples and diagrams is best understood by an example. When I was writing the second version of Rails, Angular, Postgres, and Bootstrap, I was updating the book for major new versions of Rails and Angular. It was painful, but since the Rails and Angular don’t have breaking changes often (LOL ANGULAR), it didn’t feel too bad to go through and update everything by hand.
Until I was ready to release and both Rails and Angular created new breaking changes in some configuration. These changes both happened to affect code samples early in the book. Meaning: I had to apply these changes to pretty much every copy of the downloadable code samples. By hand. After just having done it already.
Of course, I had not planned on any way to do this. It was a huge pain.
Inspiration from Agile Web Development with Rails
I was asked to be co-author on Agile Web Development witih Rails 5.1, along with tenured author Sam Ruby. The new edition was going to just refresh a few things and not be a radical change. I figured it wouldn’t be too bad. Boy was I wrong.
Sam, having maintained the book over several versions of Rails, and built a giant Ruby script that executed the
code, edited the files, and did what the book said to do with the running example. It’s open source and you can
check it out. When the book said “add this line of code the OrdersController”,
Sam’s script did just that and saved off the code as it looked after the change, extracting relevant snippets to be in-lined into the actual book.
It was such a beautiful hack, and upon seeing it, I couldn’t imagine any other way to maintain that book over the many editions it has had. It was really nice to be able to make a change in chapter 7 and be sure that the effects of that change would be applied all the way to the final chapter.
But, like all good beautiful hacks (especially those built and run by a single person over many years), it was a bit rough around the edges. Even though it was maddening at times, it was a net positive and made it possible to maintain the book. It worked and allowed the book to maintain its relevance for many years. It even provided useful feedback to the Rails team: Sam could checkout edge Rails, run the book, and tell the team what broke.
At that point, I knew that any programming book I wrote after this would use a toolchain like what Sam had built. It removed a big chunk of friction that I absolutely hated having to deal with. Sam’s system worked for him, but was designed to interoperate with the Pragmatic Programmers toolchain. That toolchain largely handled building the book and typesetting, so Sam’s automation really was about maintaining the running example1.
When I set out to write Sustainable Web Development with Ruby on Rails, I planned on self-publishing. I also knew that I’d want to keep the book updated, working, and recent. While the content in the book is somewhat timeless, I wanted it to have modern examples, work with modern tools, and feel like it had just been written for the latest set of Ruby on Rails tools. I also wanted it to look awesome on EPUB, Kindle, PDF, and in print. That meant I had my work cut out for me.
A Detailed List of Fussy Requirements
I am particular about the typography of books and in programming books especially, making sure that all the necessary typographic features available are supported. For example:
- Parts, Chapters, Sections, Subsections are a given
- Code examples need look good and highlight changes the reader is expected to make or pay attention to
- Command line invocations should show their output when needed
- Liberal screenshots to show the effect of visual aspects of the software being discussed
- Technical diagrams to explain difficult concepts
- Footnotes for links and short asides
- Sidebars for longer asides
- Cross-references to tie disparate sections of the book together
- An index
In addition, however I did not want to:
- Maintain separate code by hand
- Manually run command line invocations and copy/paste their output
- Create downloadable samples by hand
- Fire up a web browser to take screenshots
- Run Graphviz on the command line whenever a diagram needed updating
I wanted the tool to allow me to write the entire book - text, code, screenshots, and diagrams, all together and have it do all the work for me.
I knew that my typesetting requirements could be met by LaTeX. LaTeX sucks to write in. It sucks hard. But, I knew that Pandoc could take in myriad formats and produce LaTeX, which could then be used to produce a PDF. Pandoc could also produce EPUB which I could use for general e-Readers and Kindle. And, while not every source format supported the typographic features I wanted, LaTeX and EPUB definitely did.
When writing The Senior Software Engineer, I wrote it in Asciidoc and converted it to LaTeX via Pandoc, so was familiar with the workflow. I didn’t like Asciidoc and wanted to write generally in Markdown. However Markdown does not support the typographic features LaTeX does and it certainly doesn’t support my automation needs.
By applying the following modest list of tools, I was able to get it all work:
- Docker
- Ruby
- Markdown
- Make
- JSON
- Graphviz
- NodeJS
- Puppetteer
- Chromium
- More Docker
- Pandoc
- LaTeX and a ton of packages
- Some fonts that I am almost 100% certain are free to use
Step 1 was processing some Markdown myself.
Augment Markdown with Directives
As I mentioned, I wanted everything about the book to be in one file. I wanted to be able to talk about some code, then just write that code in the book, and have it all extracted, edited, and saved off for a downloadable code sample.
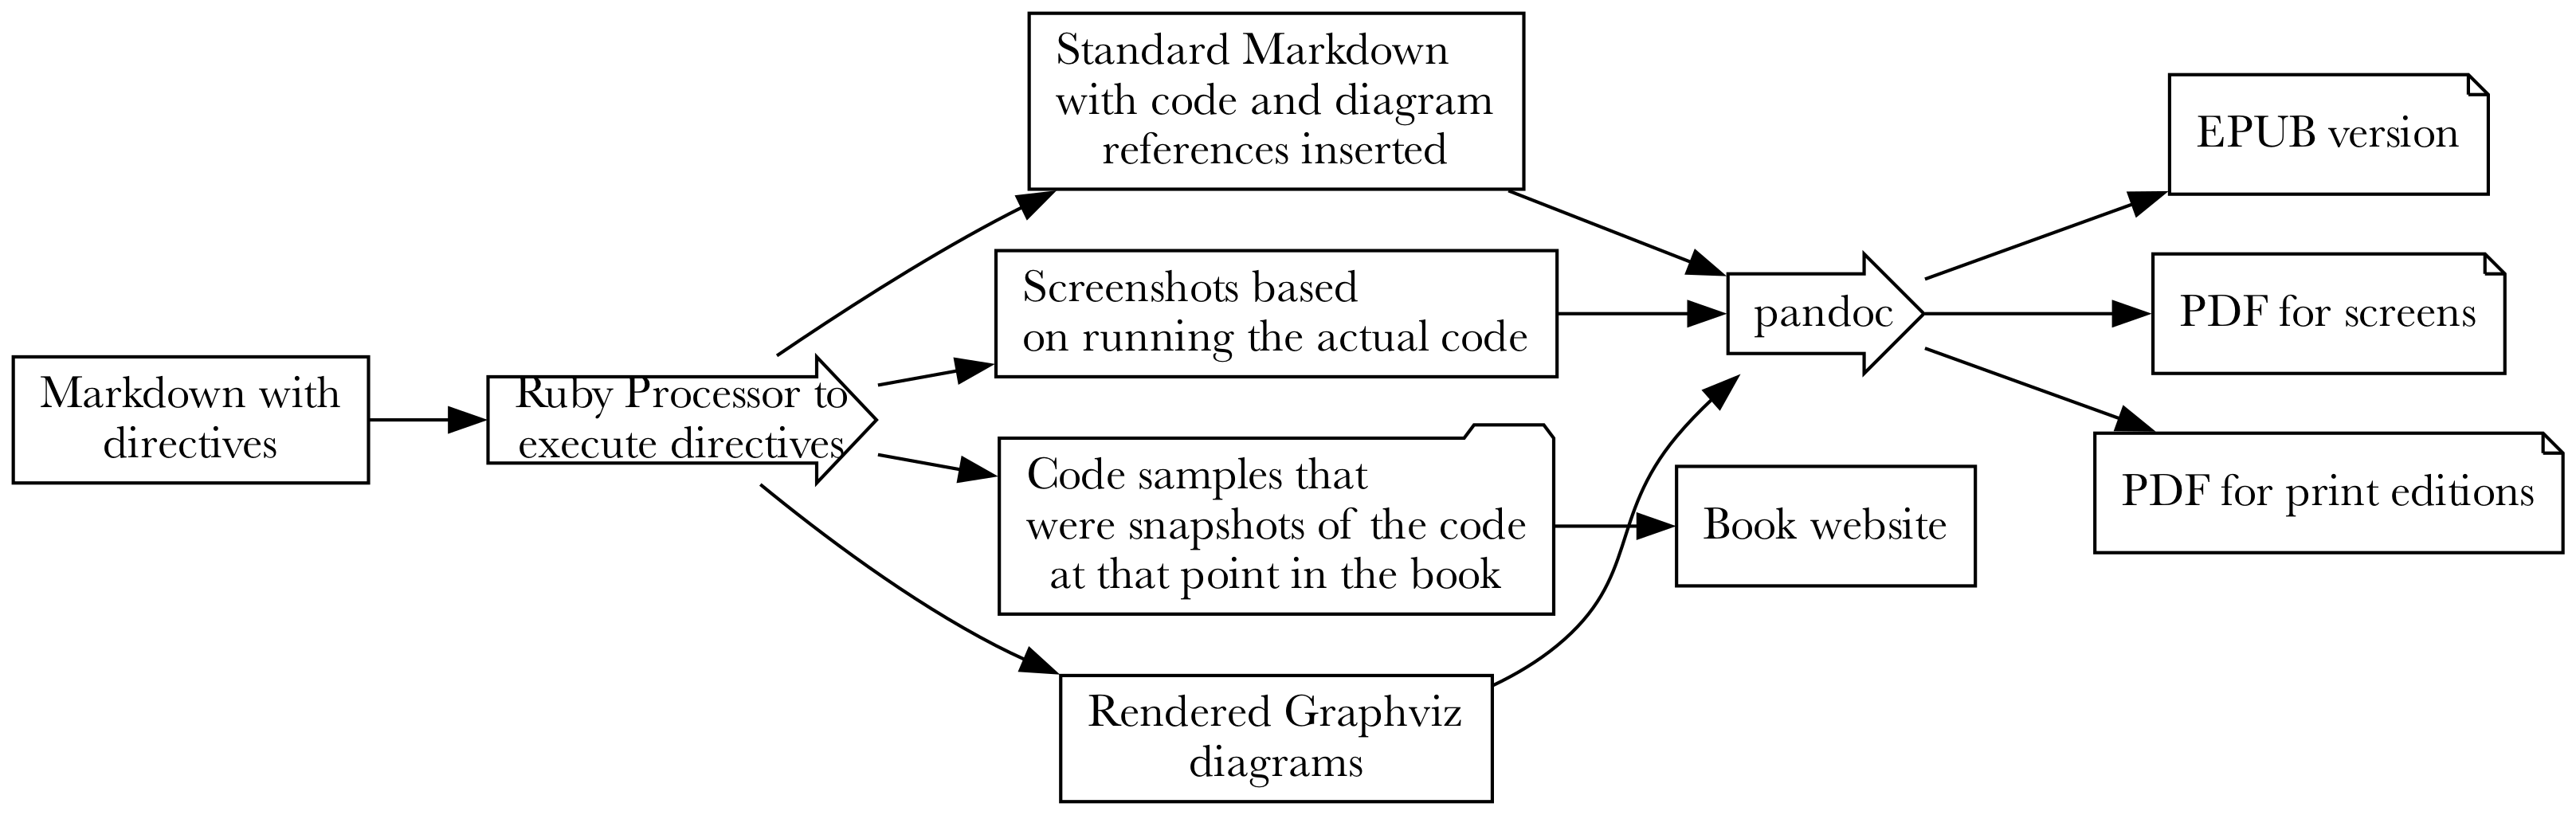
I decided to embed directives into the Markdown that would be replaced by the results of executing those directives. I didn’t need to parse the Markdown, just unambiguously detect a directive, process it, and write the processed Markdown out.
With directives for running commands, editing code, taking screenshots, and generating diagrams, I could feed my toolchain augmented markdown and have it produce normal markdown, plus supporting artifacts like images and code examples.
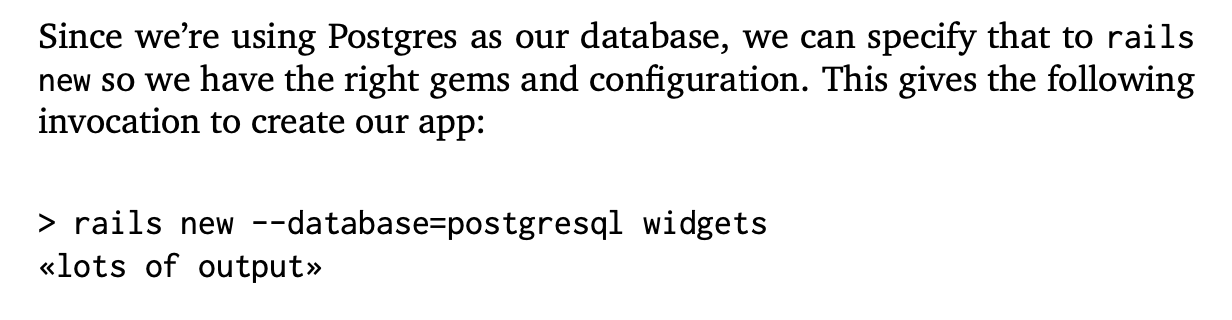
Here’s an example from early in the book where the reader is creating a new Rails app:
Since we're using Postgres as our database, we can specify that
to `rails new` so we have the right gems and configuration.
This gives the following invocation to create our app:

```!sh
{
  "setup_command": "rm -rf widgets",
  "command": {
    "output": false,
    "command": "rails new --database=postgresql widgets"
  }
}
```
The ! after the three backticks is the key to knowing there is a directive and that this is not a normal code
block. It can’t be confused with any sort of normal Markdown. The contents of this directive are JSON:
setup_command- optional command to run before that gets things set up. In this case, it deletes any Rails app it might find from beforecommand- what to run. It has some options:commandis the command line invocation to run, just as the book expects the reader to run it.outputcan be true (include the output in the book) or false (don’t include it).
The idea is that when the file containing this directive is processed, the setup command is run to set the stage, then the command is executed and its output captured. Then, the directive is replaced with the command invocation and, optionally, the output itself:
Since we're using Postgres as our database, we can specify that
to `rails new` so we have the right gems and configuration.
This gives the following invocation to create our app:

    > rails new --database postgresql widgets
    «lots of output»
This then renders in PDF like so:
This leads to the obvious quesiton of where exactly this command gets run.
Docker Docker Docker Docker Docker
When writing The Senior Software Engineer, I had the tools running on my computer. With each update of macOS, everything broke and at this point, I have no idea how I could possibly recreate it all to build the book if I had to. For Sustainable Rails, I wanted a VM-like solution so I could document the setup and preserve the results of doing so, safe from Cupertino’s meddling with my computer.
Rather than learn Vagrant, I used Docker as that seemed more generally useful to know. Of course, having the code I was asking the reader to write executed inside the computer running my toolchain wasn’t going to be a good simulation of what the reader was doing. I really needed to be able to do all the Rails stuff in a fresh environment, ideally one I could share with the reader.
Thus, a second Docker container was needed for the dev environment (you can see it here. The toolchain Docker container would use ssh to execute commands inside the dev-environment Docker container. That container could be shipped to the reader so they could follow along with the book. I could be confident that if the book said it worked, it worked, and the reader could rely on that. This has largely turned out to be true.
I also had a Postgres container running since the example app needed a database. They were all available to each other over a network created by Docker Compose.
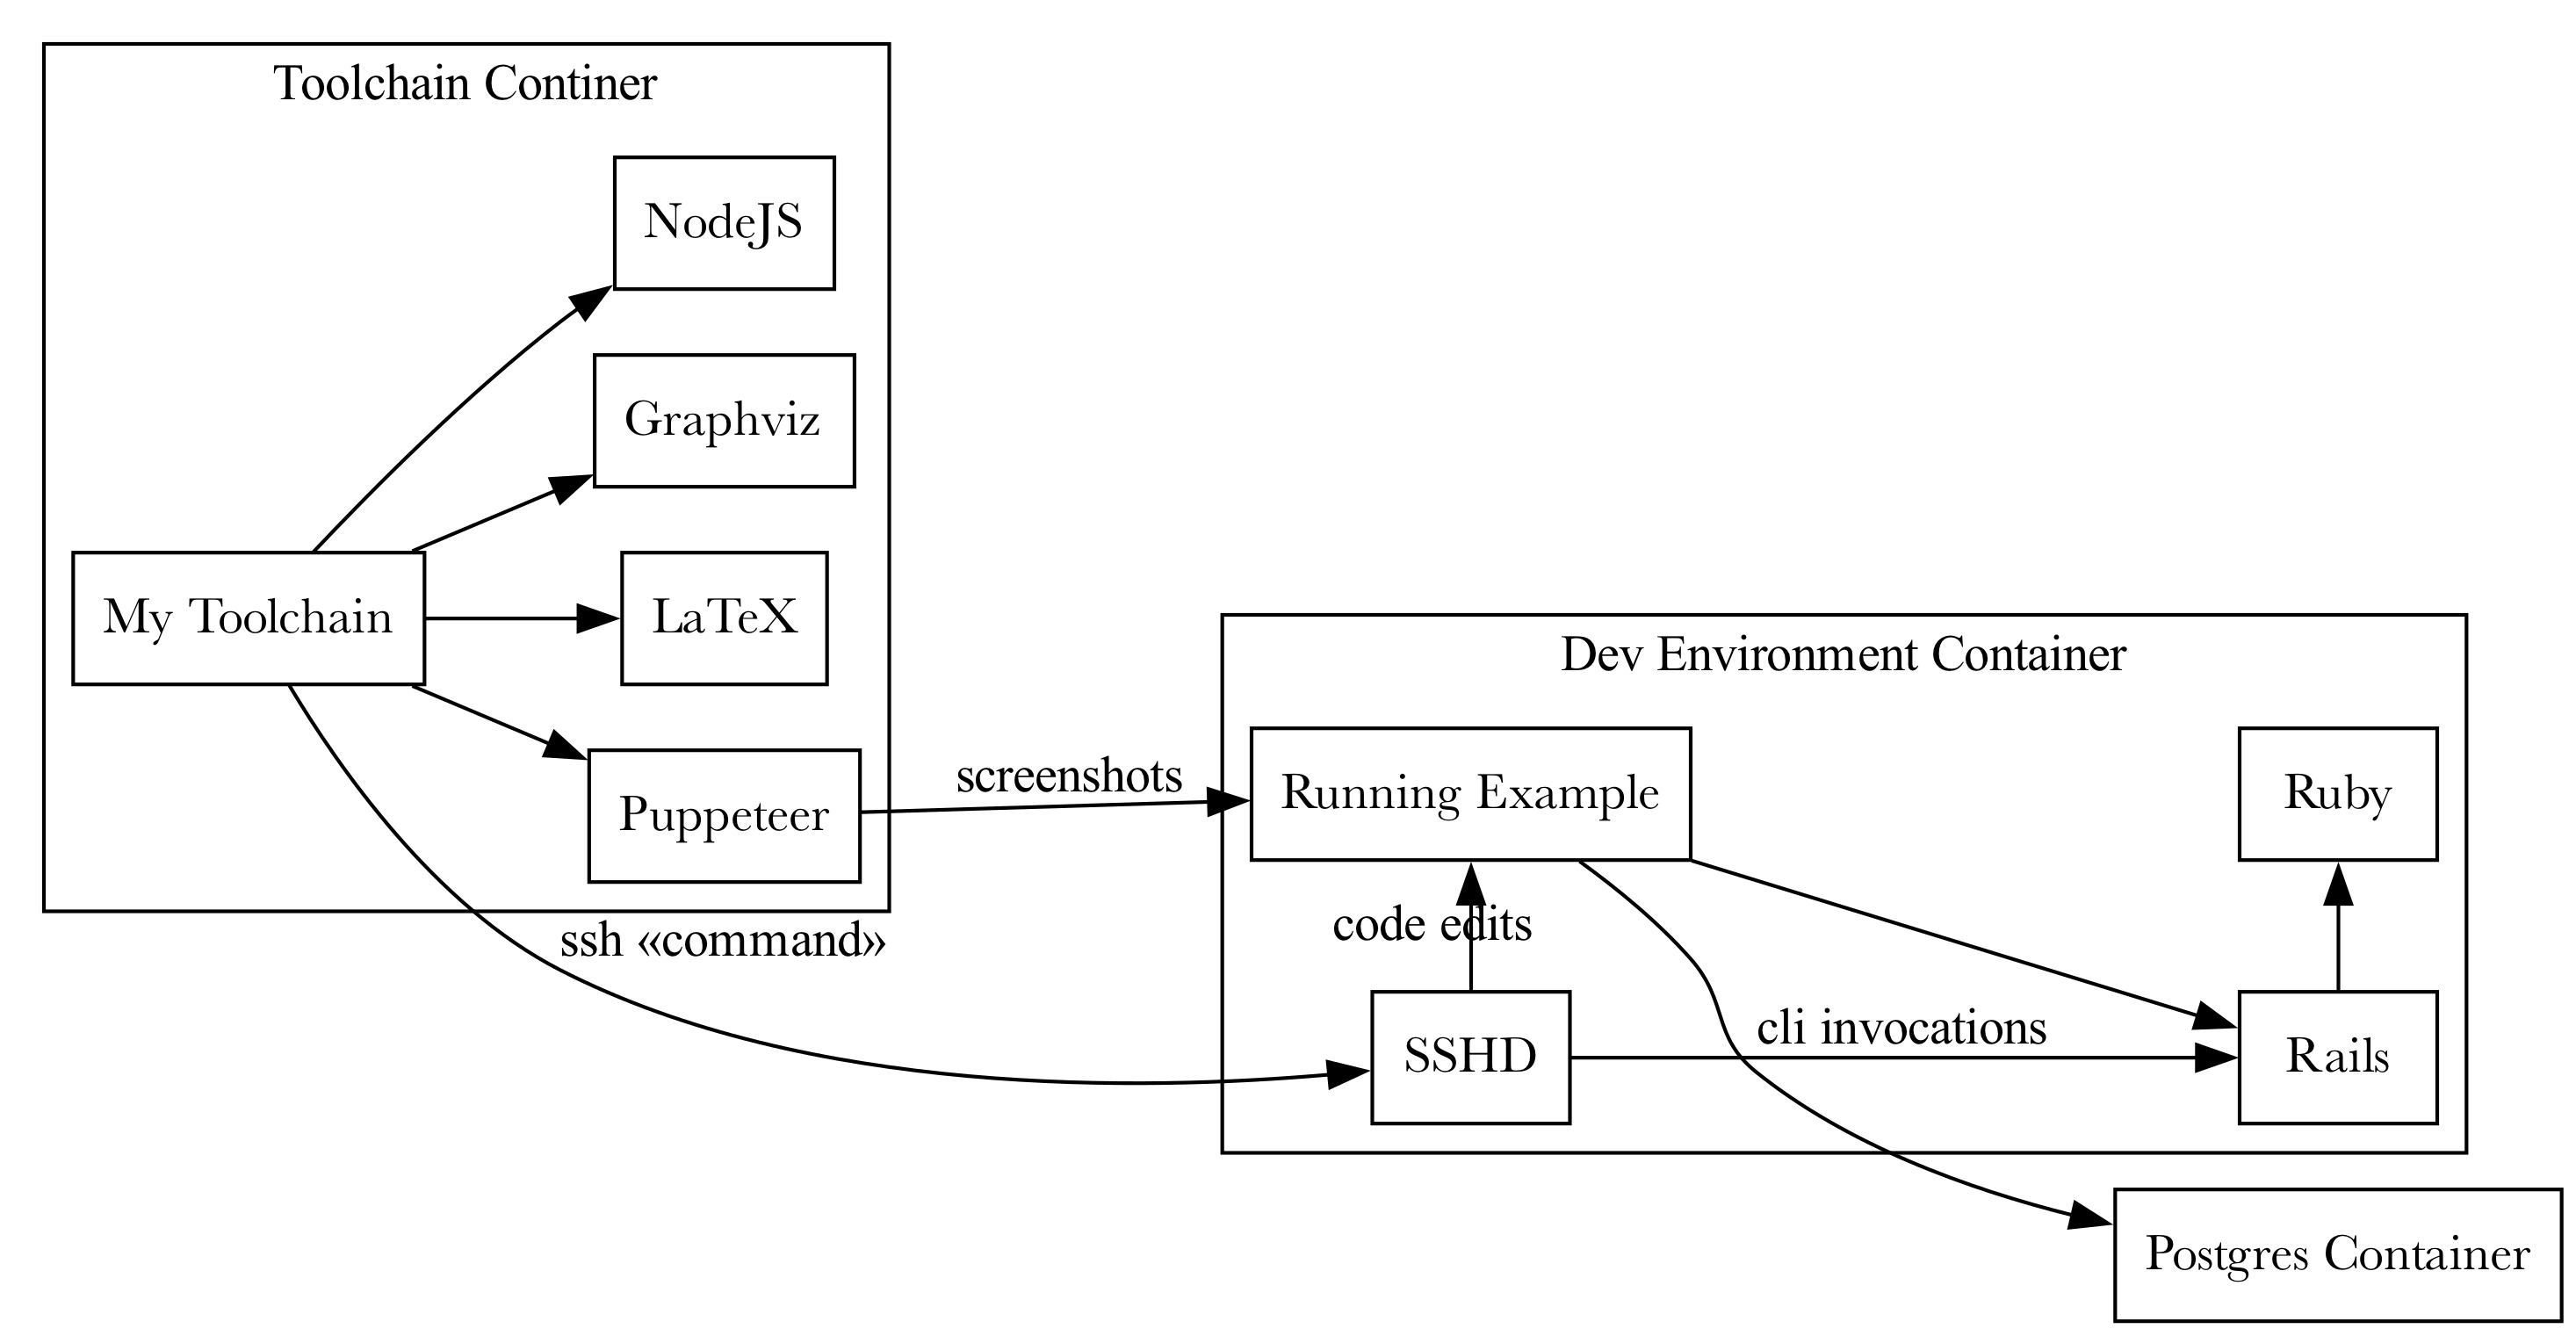
I learned a lot about Docker getting this going, and my SSHD configuration is 100% not ready for production, but it all worked. However, the ability to run commands is insignificant next to the power of editing code and showing the reader exactly what and where to make changes.
Editing Code is Messy
There are two challenges when thinking about editing code in a programming book, especially when you are actually editing i.e. changing an existing file. First, is how to explain to the reader where to make what change. Second is how to make sure that explanation is resilient to minor changes in the file.
What I decided was that each code snippet would show exactly one change at a time. It could show multiple lines being replaced, removed, or added, but all in one place in the file. If I needed the reader to make a change at the top of the file, and another change at the bottom, that would be two snippets.
For giving the reader some context, the code listings would do three things:
- Show the name of the file in a code comment at the start of the listing
- Highlight the changed or added files visually
- Show 3 lines of context before and after the change, so the reader knew where to make the edits
Given that, specifying a directive to do that reliably was a challenge. Sam’s toolchain used Ruby code and regular expressions to do this. It worked well enough when you got it right, but you had to be careful not to under- or over-specify the regular expression, and it didn’t produce error messages that I liked when things went wrong.
I decided on a more explicit, less featurful, easier to parse directive written in JSON. I knew I’d be using this infrequently after the first edition was released and didn’t want to have to re-learn an API or debug complex interactions.
All I needed was the ability to locate an anchor line of code, then indicate if the reader should replace it, put
code before it, or put code after it. The toolchain would do the rest. Here’s an example where we add a line to
the Gemfile:
First, we’ll install dotenv by adding dotenv-rails it to our Gemfile:
```!file
{
  "file": {
    "filename": "Gemfile",
    "type": "ruby",
    "edit": {
      "find": "ruby \"3.1.3\"",
      "append_below": [
        "",
        "# All runtime config comes from the UNIX environment",
        "# but we use dotenv to store that in files for",
        "# development and testing",
        "gem \"dotenv-rails\", groups: [:development, :test]"
      ]
    },
    "cwd": "widgets"
  }
}
```
This produced the following vanilla Markdown:
First, we'll install dotenv by adding `dotenv-rails` it to our `Gemfile`:


    # Gemfile

      git_source(:github) { |repo| "https://github.com/#{repo}.git"…

      ruby "3.1.3"
    →
    → # Ruby < 3.0 included rexml by default, but now
    → # it's a separate gem that is required for running tests
    → gem "rexml"

      # Bundle edge Rails instead: gem "rails", github: "rails/rail…
      gem "rails", "~> 7.0.4", ">= 7.0.4.2"
Which then looks like so:
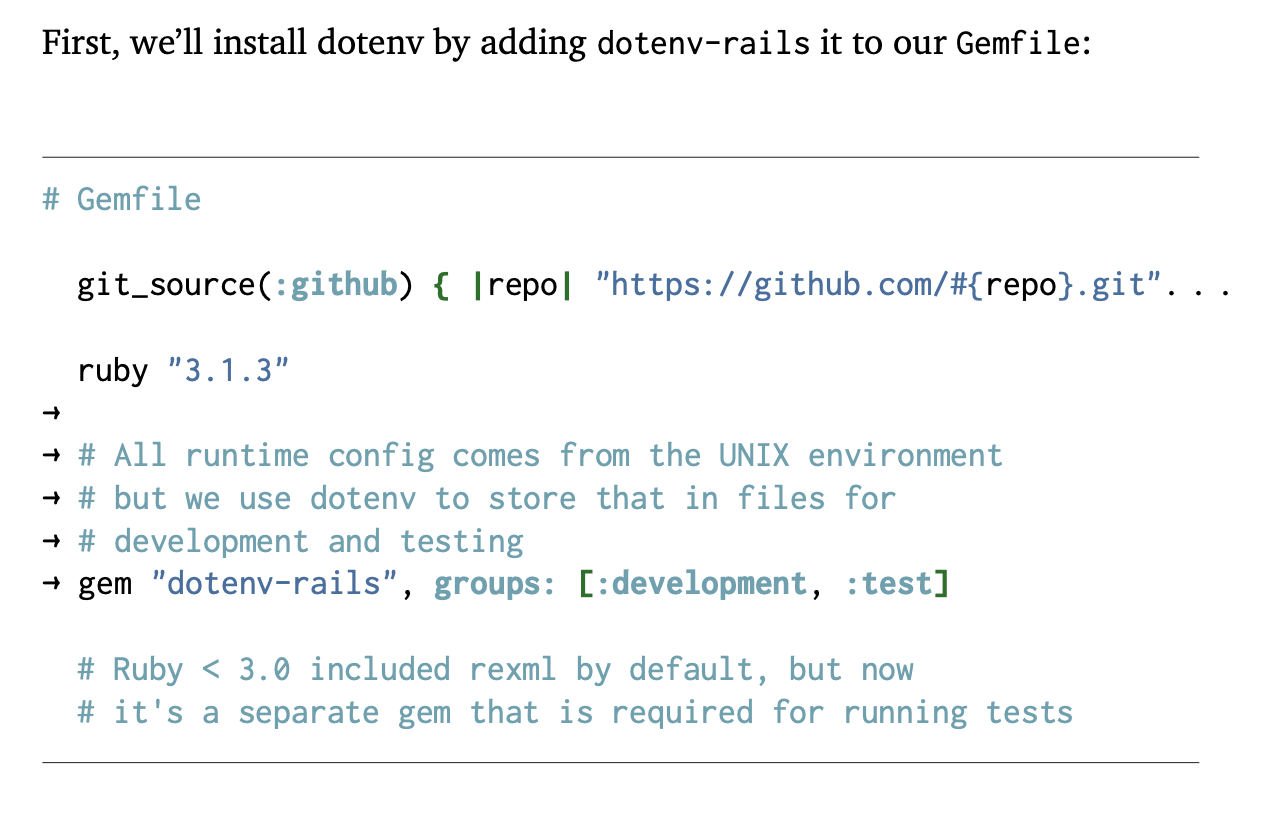
The arrows highlight what was added, and we have usually enough context before and after to know where in the file to put the code. Also note how long lines are truncated with an ellipsis. We don’t want lines going into the margin or off the page, and while I tried to make all code fit in the right width, some of the code was generated by Rails and couldn’t be changed.
As to the JSON format itself, it’s a little annoying with all the quoting, but it made parsing and error reporting very easy. I was able to use a vim macro to easily paste in code and format it.
Now, you might be thinking that building the book is slow. Each chapter executes code, changes files, executes more code on and on. And you would be right: it is slow. And the feedback cycle could be brutal if it all had to be rebuilt every time and you were working on a later chapter.
That’s why I built in caching.
Caching Snapshots to Produce Code Samples
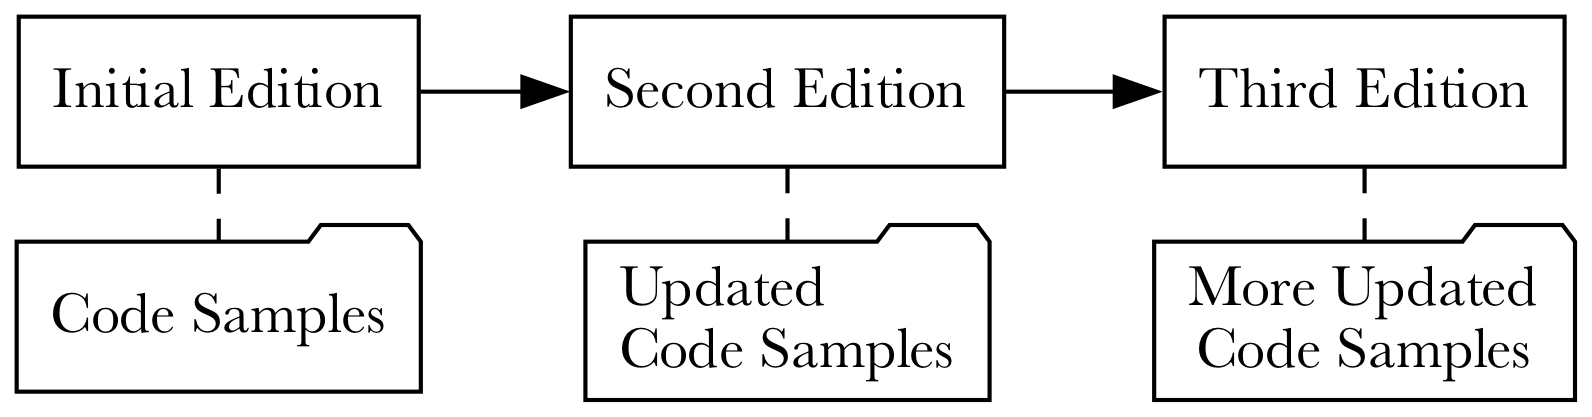
All good programming books should have code samples, and the more complete and useful those samples are, the better. Usually, the code samples in a programming book are built progressively over the course of the book, each sample building on the previous ones. For Sustainable Rails, I wanted a complete and fully functional Rails app to be the sample for each section of the book where code was written.
And, as it happens, those samples could be used as a caching layer. If I was changing section 4 of chapter 12, I should be able to make edits based off of the the code samples from section 3 of chapter 12. I should not have to rebuild the samples from chapter 1 each time.
At the top of each markdown file is a caching directive:
snapshot: { "dir": "widgets", "restore": "10-03", "save": "11-01" }
This is always on one line, always the first line of the file. This says that before executing any directives for this section, restore the snapshot named 10-03 to the directory widgets. If the section completes without incident, store the updated code as snapshot 11-01.
At the end of the build, my snapshots directory gets zipped up and serves as the code samples for the book. The names are the chapter and section numbers. Yes, I could probably derive this information and not specify it, but I was just happy to have this caching layer. It worked great and sped up builds tremendously.
How, though? Two words: make
Make Is The Secret Weapon You Love to Hate
If you haven’t used make before, it’s something you may find extremely useful for personal scripting or other
projects where you are managing a bunch of files getting transformed from one format to another. Make allows you
to create a Makefile that describes dependencies between files and how to make one from the other.
For example, suppose that to create hello.pdf I need both hello.tex and cover.png to be given to pdflatex. hello.tex is an intermediate file that’s created from the true source, hello.md, which is input to pandoc. Further, cover.png is created from the source image, cover.tif. I use ImageMagick to create cover.png from cover.tif
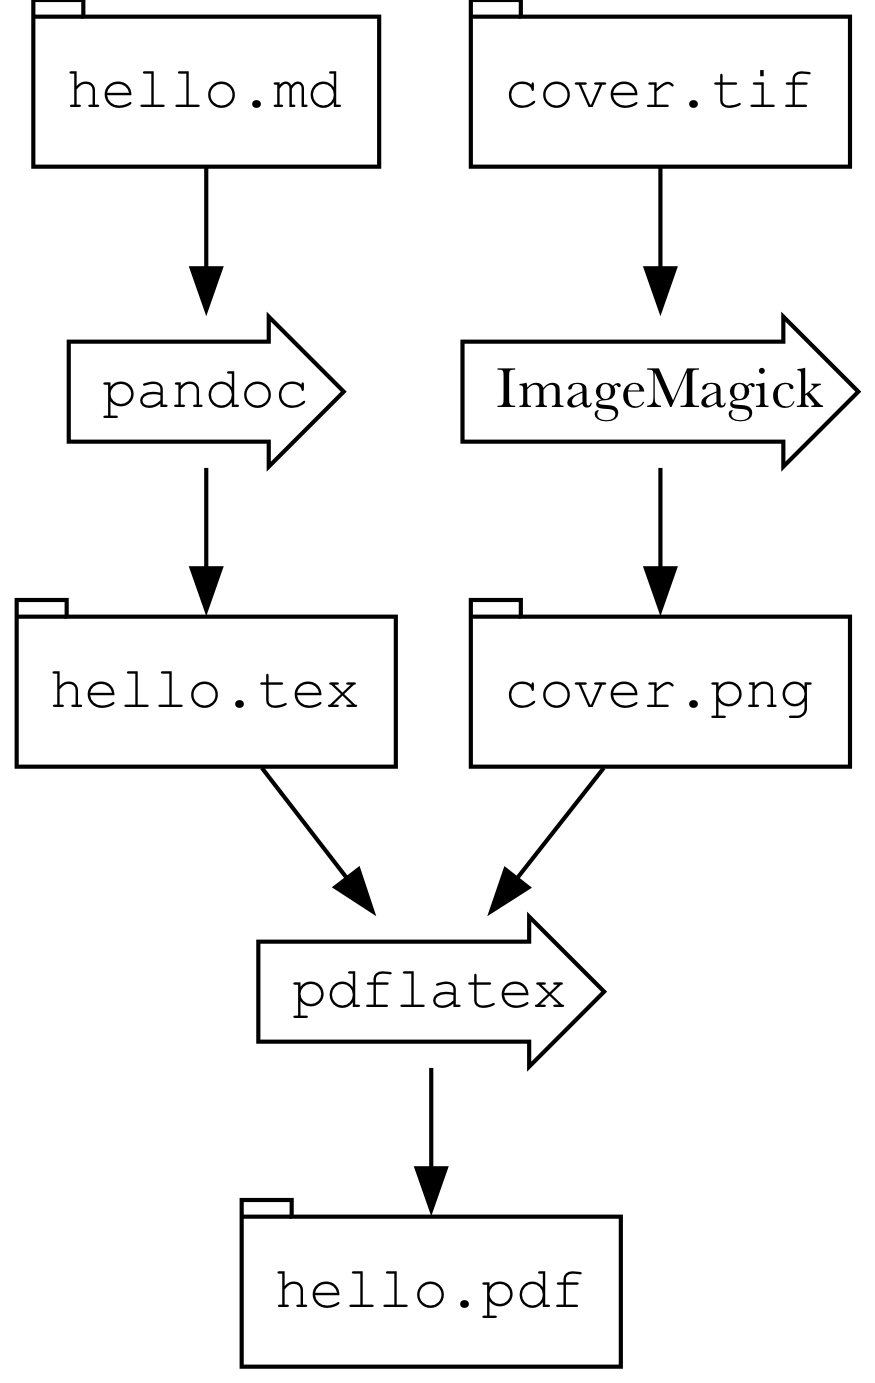
In a Makefile, you’d write this:
hello.pdf: hello.tex cover.png
    pdflatex hello.tex cover.png

hello.tex: hello.md
    pandoc hello.md

cover.png: cover.tif
    convert covert.tif
When you run make hello.pdf, Make will figure out which files are out of date and build what is needed. For
example, if I’ve just built everything, but then edited hello.md and ran make hello.pdf, Make would realized
that since cover.png is not out of date, it won’t convert cover.tif into cover.png. But, since hello.tex
is out of date (due to having changed hello.md), it will run pandoc again. That will make hello.tex more
recent than hello.pdf and re-run pdflatex.
With a sufficiently complex system, a carefully-crafted web of dependencies can result in very fast incremental builds and very little waste. This means fast feedback cycles. It works best when everything is file-based.
So, I made sure that my agumented-markdown-to-plain-markdown toolchain operated per file and that I created one
file per section of the book (as opposed to one per chapter or one big file). It knew that if
12-03.md had not changed, there was no reason to process it. Thus, if I changed 12-04.md, along with the
snapshotting system, my Makefile would not process 12-03.md, would restore 12-03’s snapshot, then process
12-04.md.
This meant that during the editing and revision phase of the book, I was building as few artifacts as possible to get feedback. It wasn’t an instant preview situation, but still pretty good!
It also meant that each step of the process was handled by a smaller, less complex program. The job of my Markdown processor was just to produce vanilla Markdown. Pandoc handled the typesetting.
OK, so with running commands and editing code handled, what about diagrams?
Graphviz is Awesome
For diagrams, I needed a) the Graphviz source, b) a label to use for captions, and c) an id for cross-referencing. Rather than put the lines of the Graphviz source in a JSON array of strings, I put the Graphviz source as the body of the directive and used the directive line itself to indicate the id and label. Here is an example:
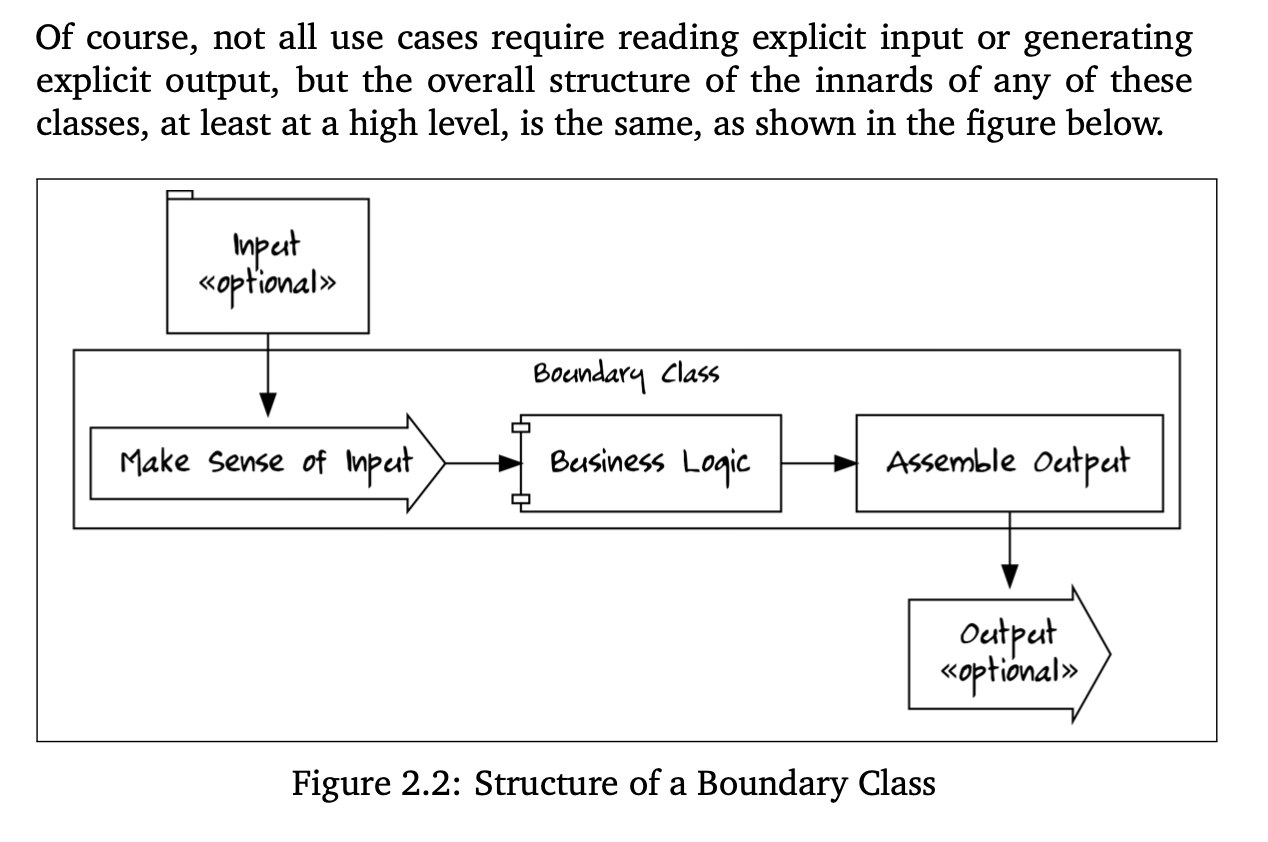
Of course, not all use cases require reading explicit input or
generating explicit output, but the overall structure of the
innards of any of these classes, at least at a high level,
is the same, as shown in the figure below.

```!dot structure-of-boundary-class Structure of a Boundary Class
digraph boundary {
  nodesep=0.5
  rankdir="LR"
  concentrate="true"

  node[margin="0.2,0.2"]

  Input[label="Input\n«optional»" shape="tab" ]
  Output[label="Output\n«optional»" shape="rarrow" ]
  subgraph cluster_class {
    label="Boundary Class"
    ParseInput[label="Make Sense of Input" shape="rarrow"]
    AssembleOutput[label="Assemble Output" shape="box"]
    BusinessLogic[label="Business Logic" shape="component"]
    rank=same
  }

  Input -> ParseInput [ constraint=false ]
  ParseInput -> BusinessLogic
  BusinessLogic -> AssembleOutput
  AssembleOutput -> Output [ constraint=false ]

  Input -> BusinessLogic [ style="invis" ]
  Input -> AssembleOutput [ style="invis" ]
  ParseInput -> Output [ style="invis" ]
  BusinessLogic -> Output [ style="invis" ]
}
```
This would save off that Graphviz into a .dot file, then run dot on it to produce an image. That image was then
referenced in the Markdown like so:

This looks like so in the book:
Note that in the Markdown, I had to put a LaTeX cross referencing anchor (\label{...}), along with a more
standard HTML one. Pandoc didn’t quite produce the cross-referencing I needed on its own. Thus, to refer to this
diagram required using both LaTeX and HTML:
Remember the [boundary diagram](#fig:structure-of-boundary-class)<span class="latex-only">on page
\pageref{fig:structure-of-boundary-class</span>?
The EPUB CSS set anything with latex-only as display: none, so this was my hack to get cross-referencing to
work properly
Now, all this command-line executing, code editing, and diagramming sounds great, but the screenshots are the true bane of most writers’ existence. For that, I used Puppeteer.
Puppeteer to the Rescue
Taking screenshots sucks, especially when you need them to be high enough resolution to look decent in print. Fortunatley, there are myriad tools to orchestrate browsers and Puppeteer was just what I needed. It has a pretty basic, albeit callback-tastic, API, is actively maintained, and flexible enough to take screenshots without requiring an actual graphical UI to pop up.
Once I had an image, I could use a similar technique for Markdown and cross-referencing as I did for the Graphviz diagrams, but the trick is to get the image itself. There are two main problems:
- Getting the app into the right state to take the shot
- Cropping the shot so it shows just what is interesting
Most of my screenshots involved opening a specific URL and capturing the browser. And all of my shots could be cropped by just giving a width and height relative to the upper-left of the browser screen.
So, I created a command line app, screenshot.js that would do those things. But there were a few screenshots
that required interacting with the app. For that, screenshot.js accepted the name of a script, and I embedded
that script into screenshot.js.
For example:
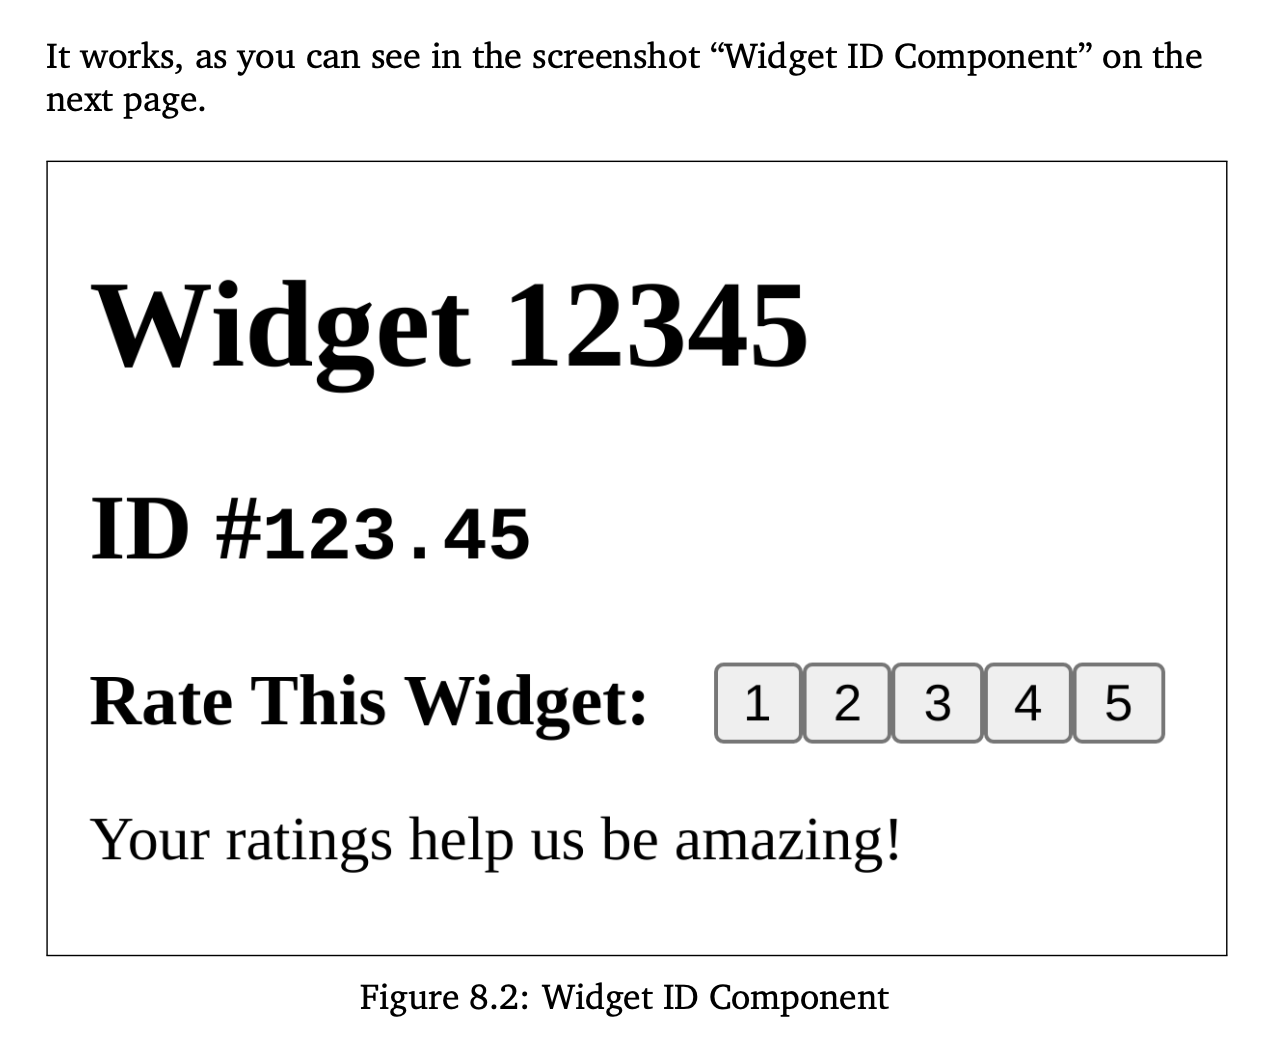
You can see in the following screenshot what the app
looks like after we've rated the widget:

```!screenshot
{
  "pre_command": {
    "cwd": "widgets",
    "command": "bin/run"
  },
  "screenshot": {
    "url": "http://sustainable-rails-dev:3000/widgets/1234",
    "title": "Ajax-based widget rating",
    "label": "ajax-based-widget-rating",
    "dimensions": "300x200",
    "script": "clickRatingRails"
  }
}
```
This is how it looks in the book:
pre_command starts up the server and waits for it to be responsive. That part of the toolchain is woefully tied
to Sustainable Rails, but could be extracted. screenshot configures where to go and how to take the
screenshot. Most screenshots didn’t need the script attribute, because they could just bring up url and take
the shot.
But, in this example, I needed the browser to click on the page, wait for some markup to change, and then take
the shot. To do this, I set up a function inside screenshot.js called clickRatingRails that would use
Puppeteer’s API to get the page into just the right state.
It is callback hell, but it works2:
"clickRatingRails": (browser, page, filename) => {
  return page.evaluate( () => {
    console.log("Dumping HTML")
    console.log(document.body.innerHTML)
  }).then( () => {
    return page.click("section ol li button").then( () => {
      console.log("Clicked Rating Button")
      return page.waitForSelector(".db[data-rating-present] span[data-rating-label]").then( () => {
        console.log("Navigation Done")
        return page.screenshot({path: filename}).then( () => {
          console.log("took screenshot")
        }).catch(error(browser))
      }).catch(error(browser))
    }).catch(error(browser))
  }).catch(error(browser))
}
This was not easy to create or debug, so I left all the console.log statements in there in case things went
wrong. The toolchain’s extensive logging would print them out.
For sizing, I’d typically take the shot at full browser size, open it up in macOS’s Preview app and figure out the dimensions for cropping. I’d then re-run after setting dimensions to the dimensions for the crop. The title and label worked like they did for the Graphviz stuff.
And with that, every single screenshot is automated. If I changed CSS in chapter 4, I could re-run the book, and that CSS change would flow through automatically to all the screenshots. This was a huge win for productivity, because I didn’t have to constrain edits or changes based on having to re-do screenshots.
The only thing left was to do the sidebars
Deep Dive Into Pandoc Filters
I love sidebars. I love when books have these detailed asides to go deep on something unrelated to the concepts at hand, but still relevant to the overall book. In my case, I wanted to be able to tell some anecdotes about my experience writing Rails without it being a diversion. Sidebars are a typographic technique to let the reader know they can skip a big block of text and come back to it later.
The main issue is that LaTeX and EPUB have no particular concept of a sidebar. This meant that I couldn’t use my Markdown processing to craft some vanilla Markdown that produced sidebars. I’d need to instead embed something in the Markdown and have Pandoc produce the correct HTML for an EPUB sidebar, and the correct LaTeX for the PDF sidebar.
Fortunately, Pandoc has the concept of filters that allow you to manipulate the parsed document. Even more fortunately, you don’t have to write them in Haskell (Pandoc is written in Haskell). Thus, I used Ruby.
Since Markdown technically allows inlined HTML, I decided to write sidebars using the <aside> tag with a class of
only sidebar and a required title and label attribute. I then wrote a Pandoc filter that would be given
the parsed JSON and be expected to output modified JSON. The core routine looks like this:
if content =~ /^<aside class="sidebar" title="(.*)" label="(.*)">/
  log.puts "Detected sidebar: #{$1} #{$2}"
  if options[:format] == "latex"
    block["c"][0] = "tex"
    block["c"][1] = LATEX_SIDEBAR_START % { title: $1, label: $2 }
  else
    block["c"][0] = "html"
    block["c"][1] = EPUB_SIDEBAR_START % { title: $1, label: $2 }
  end
elsif content =~ /<\/aside>/
  log.puts "Detected end of sidebar"
  if options[:format] == "latex"
    block["c"][0] = "tex"
    block["c"][1] = LATEX_SIDEBAR_END
  else
    block["c"][0] = "html"
    block["c"][1] = EPUB_SIDEBAR_END
  end
elsif content =~ /^<aside class="sidebar"/
  raise "Sidebar without title or label: '#{content}'"
else
  log.puts "#{Time.now} - Ignoring html RawBlock with content '#{content}'"
end
There’s more to it than that to properly detect a block of code, but basically if I saw my magic sidebar HTML, I’d
check if I was outputing LaTeX or HTML and replace the content appropriately. For EPUB, I just needed to insert an
<a id=> tag for cross-referencing and put the title into the output.
For LaTeX, I spent quite a while tailoring the tcolorbox module to produce a fancy box with different typography and colors. After several test printings I eventually kept the color as black text on a white background, using slightly altered typography (smaller font with shorter leading).
And behold:
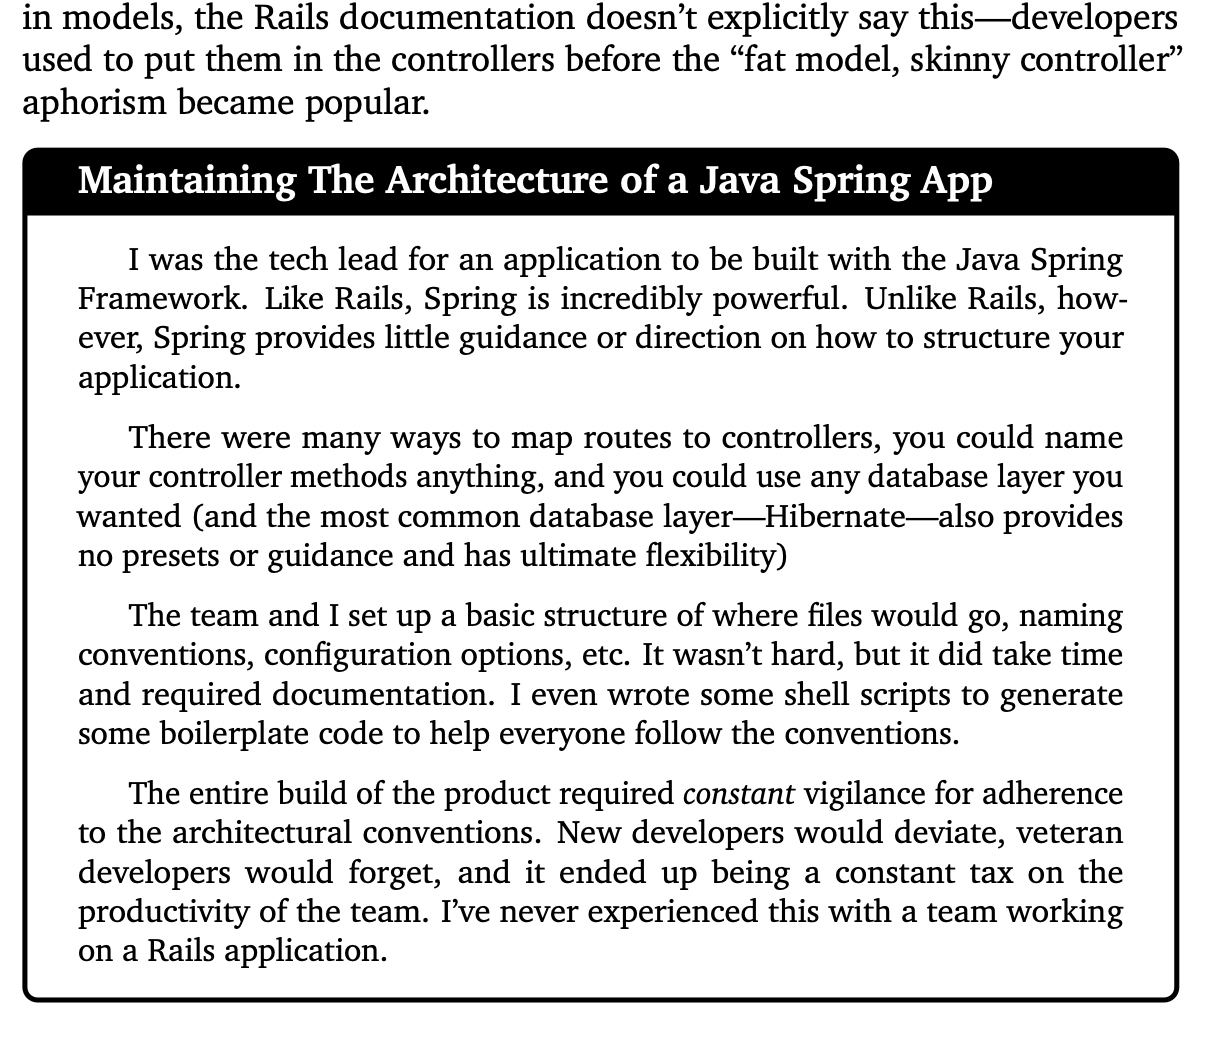
It’s possible I could’ve done more with Pandoc filters, but it was hard to debug and get right. What I wrote is simpler to undersatand since it parses standalone augmented Markdown files and produces standard Markdown files as output.
Other Bits and Bobs
For the index, I put raw LaTeX in the Markdown. I couldn’t find a better way to do it, but an index is only relevant for a printed book anyway (since you can’t search a physical book), so I was fine with that. I did that at the end because it greatly disrupts the text. Here’s a paragraph that is creating index entries for “database → lookup tables” and “lookup tables”:
\index{database!lookup tables}\index{lookup tables}When a column's value
should be one value from a static list of possible values, an `ENUM`
can work as we discussed above.
LaTeX and Pandoc took care of the table of contents as well as page numbering, margins, and all that. I was even able to extract the table of contents from the EPUB to put on the book’s website, as well as hack out a sample chapter from all this as well.
The absolute trickiest part was something I thought was super important: sidebars
Of course, a few things still had to be done by hand :(
Manual Stuff
There were a few manual things I couldn’t avoid. In a few parts, I needed a diagram Graphviz couldn’t make and had to do that by hand. Annoying, but not a huge deal. The covers were a bit of a nightmare, though.
The EPUB has to have a cover, but it can’t be too big. The non-print PDF needs a cover, but the print PDF does not. The paperback needs a different cover than the hardcover edition. And, of course, the EPUB needs a JPEG and the print editions need a PDF.
I was able to use make and ImageMagick to convert the source files into the various versions (I could crop the paperback cover to produce the EPUB), but they all still had to be uploaded into Kindle Direct Publishing, checked, and validated.
A final pass at typesetting was quite manual. While LaTeX does a good job of avoiding orphans and widows, I wanted to make sure the PDF avoided a few things:
- I don’t want to have to use page numbers in cross-referencing for diagrams unless necessary. It’s much better, in my opinion, to say “the screenshot below” or “the screenshot on the next page”. Knowing which phrase can be used requires the final book to be typset, then updated, then re-typeset to make sure it still works.
- You may have noticed I offset codeblocks with horizontal lines. The book also has numerous footnotes and they are shown in the bottom margin with a line above the note. I didn’t want a page to end with a codeblock and also have a footnote line right after. I also didn’t want the line for code to appear on its own without any code with it. Fixing this required some tactical rewrites of the code or text to force stuff to move around.
- And, of course, some code would run off the page and had to be fixed by hand.
This was time consuming because one change can ripple through the book. If I pushed one codeblock onto a new page, would that push one on a subsequent page into the wrong place? There’s a reason typesetting is a trade and costs money.
Beyond that, building the releases was generally manual and kindof a pain. I also did not do a good job keeping each release handy for reference. It’s good to know exactly what I uploaded to Amazon or what I sent out to readers from SendOwl.
Where This Toolchain Could Go
While I was not trying to make an ultimately flexible ebook toolchain, I did want the system to be reliable, fault tolerant, and helpful, because I knew that once the book was initially released, I wouldn’t be in the toolchain daily and would need to have it working without remembering a lot of incantations.
I also wanted it to be, at the very least, the basis for something re-usable if I wanted to self-publish books in the future. I’d say the overlap of the toolchain and Sustainable Rails is about 30% at this point, so the next book I can make it better.
I also wanted to be able to produce an HTML version so I could create shorter-form stuff that might be free on the web, but a nominal fee as an ebook or printed book. Theoretically possible, but not there yet.
I would love to share this with other book authors, too, because it really does make a world of difference being able to have all the code examples and screenshots scripted. I would certainly have continued to keep Angular, Rails, Postgres, and Bootstrap updated over the years if I had this in place.
Aside from all this, if you are producing technical documentation that has screenshots and example code, I would encourage you to invest in a toolchain to automate as much of that as you can. Make it so that you just have to type out your text and code and automation will produce working samples. It will encourage you to keep things updated and avoid big rewrites.
As for my Toolchain, I’m not quite able to make it open source, but the next book I do, I should be able to revist it more and make it more separate from the Sustainable Rails book.